Demultiplexing functionality
This command is used to demultiplex fastq files and assign the sequencing reads to their associated samples. The tool requires the following mandatory input files to perform the demultiplexing:
- Fastq files (single/paired-end).
- Sample sheet which contains sample indexes and their templates (will be explained in detail).
Simply, the tool reads the barcodes at the end of R2 (reveres) reads for paired-end reads input or the end of R1 (forward) reads for single read input. Based on the barcode, it assigns the read to the relevant sample allowing for mismatches less than a specific threshold. The tool outputs fastq files for each sample as well as some summary reports that can be visualised through the MultiQC tool and mgikit plugin.
Mandatory input files
-
-hor--help: Print help -
-Vor--version: Print version
Fastq input file
-
-f or --read1: the path to the forward reads fastq file for both paired-end and single-end input data. -
-r or --read2: the path to the reverse reads fastq file. -
-i or --input: the path to the directory that contains the input fastq files.
-i or -f/-r, -f should be provided for a run.Input sample sheet
-s or --sample-sheet: the path to the sample sheet file. It can be tab or comma separated. The tool detects the presense of any of them in the header. More details are available below on the sample sheet format and preparation.
Other Parameters
-
-o or --output: The path the output directory. The tool will create the directory if it does not exist or overwrite the content if the directory exists and the parameter--forceis used. The tool will exit with an error if the directory exists, and--forceis not used. If this parameter is not provided, the tools will create a directory (in the working directory) with a name based on the date and time of the run as followsmgiKit_Y-m-dTHMS. whereY,m,d,H,M, andSare the date and time format. -
--reports: The path of the output reports directory.By default, the tool writes the files of the run reports in the same output directory as the demultiplexed fastq files (
-oor--outputparameter). This parameter is used to write the reports in a different folder as specified with this parameter. -
-m or --mismatches: The default value is 1. The number of mismatches allowed when matching reads’ barcode with sample indexes.This number should be less than the minimal Hamming distance between any barcodes of two samples. In the case of dual index demultiplexing (i7 and i5), a read will be assigned to a sample if the sum of the mismatches between the read barcode and both indexes is less than or equal to the value of this parameter. In the case of a single index, the mismatches with the single index should be less or equal to this parameter.
-
--disable-illumina: Output reads’ header in MGI format. This option is to disable the default behaviour of the tool that outputs read files using Illumine format (for read headers and file naming). More details are below. -
--keep-barcode: keep the barcode at the end of the demultiplexed read. By default, the tool trims the barcode sequence at the end of the read sequence. This can be disabled using this flag and the demultiplexed reads will contain the barcode at the tail of the read2 for paired-read sequencing or the tail of read1 for single-read sequencing. -
--template: The general template of the index locations in the read barcode. details are in the sample sheet preparation. if all samples in the sample sheet use the same template, the general template can be passed as a parameter instead of having it in the sample sheet for each sample. The general template will be used for all samples with the combination of--i7-rcand--i5-rc. -
--i7-rc: Use the reverse complementary form of i7 when matching with the barcode. This option should be used together with the general template and will be applied to all samples. -
--i5-rc: Use the reverse complementary form of i5 when matching with the barcode. This option should be used together with the general template and will be applied to all samples. -
--lane: Lane number such asL01. This parameter is used to provide the lane number when the parameter-ior--inputis not provided. The lane number is used for QC reports and it is mandatory when Illumina format is requested for file naming. -
--instrument: The id of the sequncing machine. This parameter is used to provide the instrument id when the parameter-ior--inputis not provided. The parameter is mandatory when Illumina format is requested for read header and file naming. -
--run: The run id. It is taken from Bioinf.csv as the date and time of starting the run. This parameter is used to provide the run id when the parameter-ior--inputis not provided. The parameter is mandatory when Illumina format is requested for read header and file naming. -
--writing-buffer-size: The default value is67108864. The size of the buffer for each sample to be filled with data and then written once to the disk. Smaller buffers will need less memory but make the tool slower. Larger buffers need more memory. -
--comprehensive-scan: Enable comperhansive scan.This parameter is only needed when having a mixed library dataset (different locations for the indexes in the read barcode for some samples). The default behaviour of the tool is to stop comparing the barcodes with samples’ indexes when it finds a match. This flag will force the tool to keep comparing with all other samples to make sure that the read matches with only one sample. In a normal scenario, the read should match with only one sample, however, there is a chance that the read matches with multiple samples if the allowed number of mismatches is greater than the minimum hamming distance between the indexes, or the samples have different templates.
-
--undetermined-label: The default value isUndetermined. The label of the file that contains the undermined reads which could not be assigned to any samples. -
--ambiguous-label: The default value isAmbiguous. The label of the file that contains the ambiguous reads. The ambiguous reads are the reads that can be assigned to multiple samples. This can happen when the number of allowed mismatches is high. -
--report-limit: The number of barcodes to be reported in the list of undetermined and ambiguous barcodes for short/multiqc report. [default: 20] -
--r1-file-suf: The suffix to read1 file name. When using the –input parameter, the tool looks for the file that ends with this suffix and use it as read1 file. There should be one file with this suffix in the input directory. [default: _read_1.fq.gz] -
--r2-file-suf: The suffix to read2 file name. When using the –input parameter, the tool looks for the file that ends with this suffix and use it as read2 file. There should be one file with this suffix in the input directory. [default: _read_2.fq.gz] -
--info-file: The name of the info file that contains the run information. Only needed when using the--inputparameter. [default: BioInfo.csv] -
--report-level: The level of reporting. 0 no reports will be generated!, 1 data quality and demultiplexing reports. 2: all reports (reports on data quality, demultiplexing, undetermined and ambiguous barcodes).[default: 2] -
--compression-level: The level of compression (between 0 and 12). 0 is fast but no compression, 12 is slow but high compression. [default: 1] -
--force: this flag is to force the run and overwrite the existing output directory if exists. -
--ignore-undetermined: By default, the tool will stop if many reads were undetermined. using this parameter, will make the tool give a warning one this issue but keep demultiplexing. -
--per-index-error: By default, the allowed mismatches-m or --mismatchesare considered for both indexes. This flag will allow the mismatches per each index. -
--memory: The requested maximum memory to be used (in giga byte). Check the documentation for memory optimisation options. Default is 0 then the tool will use the available memory on the machine. -
--not-mgi: This flag needs to be enabled if the input fastq files don’t have MGI format. -
--threadsor-t: The number of threads to be utilised. By default, it uses all available cpus. -
--reader-threads: The requested threads to be used for input reading. Default is 0, which means auto configuration according to the value of the--threadsparameter. -
--writer-threads: The requested threads to be used for processing and writing outputs. Default is 0, which means auto configuration according to the value of the--threadsparameter. -
--mgi-full-header: when enabled, the tool will write sample barcodes and UMI to the read header when using MGI format, by default it will not. -
--validate: when enabled, the tool will validate the content of the input fastq files.
Understanding input files
MGI sequencing machine output a directory for the run (flowcell_id) with a subdirectory for each lane (L01, L02 ..) depending on the machine. The input fastq files can be provided to the tool in two ways:
-
Using
-fand-rparameters which will be referring to the path toR1andR2respectively for paired-end or-ffor single end fastq. -
Using
-ior--inputparameter which refers to the path to the lane subdirectory in the sequencing output directory (or the directory that contains the fastq files if the data is obtained from somewhere else). In this case, the tool will search for the file that ends with_read_1.fq.gzand_read_2.fq.gzas forward and reverse reads respectively and if no reverse read file is found, the tool considers the run as a single end run. These suffixes can be also customised using the parameters (--r1-file-sufand--r2-file-suf).
Sample sheet format and preparation
For the tool to perform demultiplexing, it needs to know the indexes of each sample to match them with the barcodes at the end of the read sequence as well as where to look for each index in the barcode. We refer to the location of the indexes within the barcode by the barcode template. For example This information can be provided to the tool in two different ways:
-
Sample sheet with all information about the indexes and their template. This is the general way of passing this information to the tool and it works for all scenarios.
-
Sample sheet with information about sample indexes and a general template passed via a separate parameter. This approach can be used if all samples have the same index template, which is the common scenario.
The sample sheet is a tab-delimited or comma-delimited file that contains sample information. The tool will check if tab exists in the header, if not found, will check for comma and uses the first delimiter found.
This file may contain all or some of these columns:
-
sample_id(Mandatory): a unique identifier that will be used to refer to the specific sample. -
i7(Mandatory): The nucleotide sequence for the i7 index for the associated sample. This will be used to demultiplex the reads by comparing it to the index found in the read barcode. -
i5(Optional): The nucleotide sequence for the i5 index for the associated sample. this will be used to demultiplex the reads by comparing it to the index found in the read barcode when using dual indexes. -
template(Optional): This column should contain the template of the barcode for the specific sample. This allows doing demultiplexing for samples from different libraries where the templates are different. If all samples have the same template, this column can be ignored, and a general template should be passed in a separate parameter. See--templateparameter. More details are below. -
i7_rc(Optional): Takes values from 0 or 1. If the value is 0, the i7 in the sample sheet will be used as is to compare with the read barcode. If the value is 1, the tool will compare the index found in the read barcode to the reverse complementary of i7 in the sample sheet. If the template was not provided in the sample sheet (general template is used), this parameter will be ignored, and the user has to provide this parameter (--i7-rc) separately. -
i5_rc(Optional): The same as i7_rc but applies to the i5 index. -
job_number(Optional): It is an id to group the samples that are from the same project for the cases when a run contains samples from multiple projects. The demultiplexer will generate demultiplexing and quality reports for each project and the whole run. It can be ignored if the run has samples for the same project or if the project-based reports are not needed.
Barcode template
To understand how to use the demultiplexing tool, it is important to understand the structure of the input data and how to provide the correct parameters for the analysis.
The sequenced reads obtained by the MGI sequencing machine contain a string of nucleotides at the tail of read2 for paired-end sequencing or the tail of read1 for single-end sequencing. This substring is referred to as the read barcode which contains the indexes of the samples, single (i7) or dual (i7 and i5) indexes. It also includes the Unique Molecular Identifier (UMI) in some cases.
The demultiplexer tool looks at this read barcode and tries to match the indexes to a subsequence within the barcode to assign the read to a specific individual. In order to accomplish that, the tool needs to know where to look at the barcode to match with the index and from where to extract the UMI. This information is provided to the tool through the template parameter.
The template parameter is a combination of four possible components of (i7, i5, um, –) separated by a colon :. Where:
i7: the region where to expect the index i7 within the barcode.i5: the region where to expect the index i5 within the barcodeum: the region where to expect the UMI within the barcode--: a discarded region that is not used.*: should be replaced by a number representing the length of the relevant index or UMI.
Examples of templates
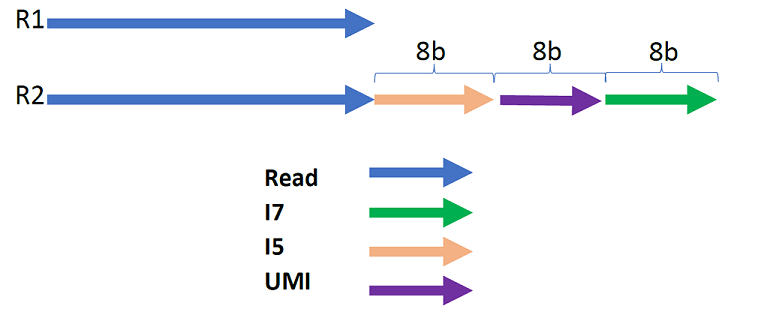
Example 1: The template i58:um8:i78 means:
-
The length of the barcode at the end of read2 (paired-end) or at the end of read1 (single-end) is 24 bp (8 + 8 + 8).
-
The last 8 bp of this barcode contains i7.
-
The middle 8 bp contains the UMI.
-
The first 8 bp contains i5.
Example 2: The template –2:i58:–2:i78 means:
-
The length of the barcode at the end of read2 (paired-end) or at the end of read1 (single-end) is 20 bp (2 + 8 + 2 + 8).
-
The last 8 bp of this barcode contains i7.
-
The two base pairs before the i5’s 8 bp are not used and should be ignored.
-
The 8 base pairs before, contain the i5
-
The first 2 bp before should be ignored as well.
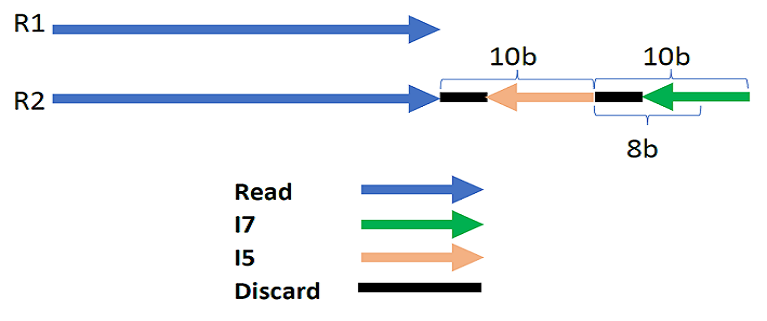
Note that in this example the direction of the arrows is to show that these indexes are reverse complementary in the reads, therefore, this should be accounted for when demultiplexing using other parameters as explained in this documentation later.
Example 3: The template –2:i78 means:
-
The length of the barcode at the end of read2 (paired-end) or at the end of read1 (single-end) is 10 bp (2 + 8).
-
The last 8 bp of this barcode contains i7.
-
The first two base pairs before the i7’s 8 bp are not used and should be ignored.
-
There is no i5 in this template as it is a single index run.
After demultiplexing, the barcode will be trimmed by default including all parts mentioned in the template. This can be disabled using the parameter --keep-barcode.
Templates and indexes forms can be provided by the user, however, the command template can detect the barcode template and the form of the indexes for the run.
Understanding output files
Samples fastq
The output fastq files can be either paired-end or single-end files for each sample in the run if they have matching reads. Reads in the input fastq file that don’t match with any sample in the sample sheet will be written to the Undetermined files. Reads that match multiple samples with the same mismatch rate will be written in the Ambiguous files. The undetermined and ambiguous files are kept in MGI format, while the sample files can be in either MGI or Illumina format (explained below) depending on the demultiplexing command.
Output fastq format
File naming
-
Illumina format (default format)
The fils will have the following pattern
SAMPLEID_S{1-n}_L0{1,2,3,4}_R{1,2}_001.fastq.gz.For example,
21-10233_S1_L01_R1_001.fastq.gzand21-10233_S1_L01_R2_001.fastq.gz.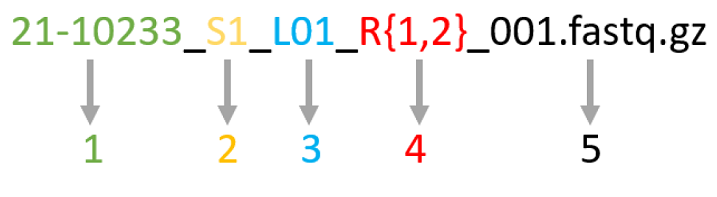
Where:
-
Sample ULN.
-
Sample order in the sample sheet.
-
Lane number.
-
R1 and R2 for paired end sequencing, or R1 for single end sequencing.
-
The remaining part is fixed for all files.
-
-
MGI format
The files will have the following pattern SAMPLEID_L0{1,2,3,4}_R{1,2}.fastq.gz.
For example, 21-10233_L01_R1.fastq.gz and 21-10233_L01_R2.fastq.gz.
The lane number is an input parameter and R1 and R2 are for forward and reverse read.
Read header
-
Illumina format (default format)
-
MGI format
Please see the details of both headers and the conversion in the figure below:
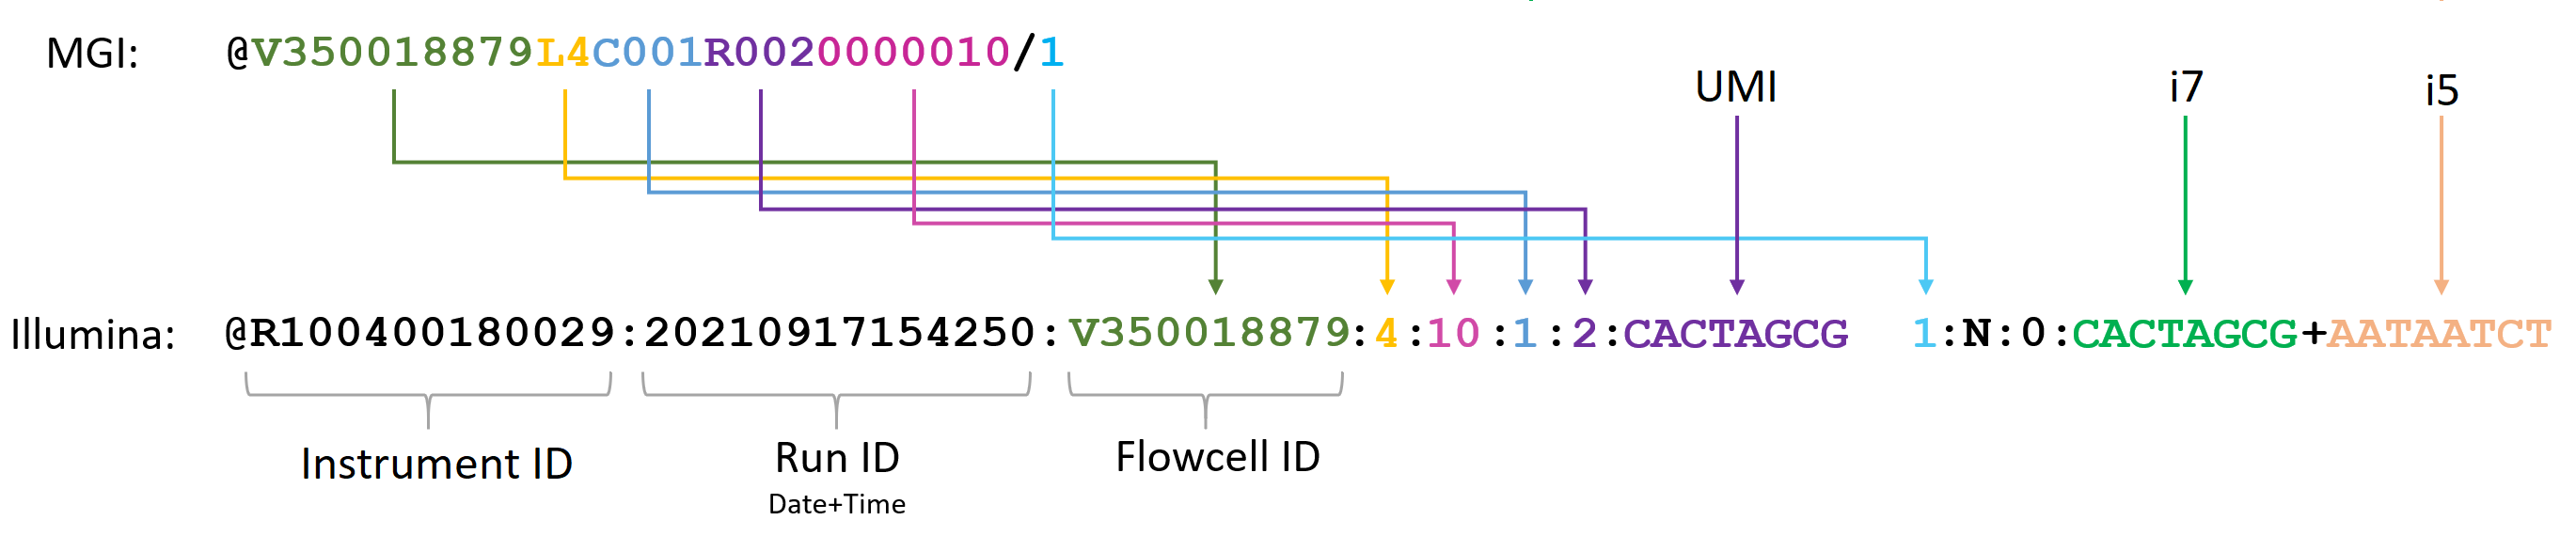
Illumina formatting requires Lane number, instrument id and run id. The three requirements can be provided using their parameters --lane, --instrument, and --run as described above.
However, if the --input was used, the tools will look for BioInfo.csv file that is generated by MGI sequencers in the input directory and extract the instrument id and run id from it.
The run id will be the date and time of the run start (“YMDHmS” format). It will also check the second element in the name of the input fastq file (after splitting it by _) if it contains the substring L0*, if yes, the lane number will be taken from the fastq file name.
If the input reads are passed using -f and -r parameters, mgikit will look for the file BioInfo.csv under the same directory as the read with barcodes (R1 for SE or R2 for PE). If found it will be used.
The user can also pass the path of a file formatted in the same way as BioInfo.csv file using the parameter --info-file. if this path is passed, instrument and run will be extracted from this file.
--lane, --instrument, and --run will be prioritised over the information in the BioInfo.csv file if these parameters were provided.
Reports
The demultiplex command generates multiple reports with file names that start with the flowcell and lane being demultiplexed. a MultiQC hitm report can be generated from these reports using mgikit-multiqc plugin as described at the plugin repository.
flowcell.L0*.mgikit.info
This report contains the number of reads per sample respectively to each possible mismatch. For example:
| sample | 0-mismatches | 1-mismatches |
|---|---|---|
| S01 | 3404 | 5655 |
This means that there was only one mismatch allowed during this execution and the sample S01 has 3404 reads with indexes matching perfectly and 5655 reads with indexes that differ by 1 base compared to the indexes provided in the sample sheet.
This file is used for the mgikit plugin to visualise quality control reports through MultiQC.
flowcell.L0*.mgikit.general
This file contains summary information related to the cluster count and quality scores, summarised for each sample as well as at the whole lane scale. This file is used for the mgikit plugin to visualise quality control reports through MultiQC.
Report content:
-
Lane statistics columns
Run ID-Lane: Run ID and lane number.Mb Total Yield: total number of bases in a million.M Total Clusters: total number of reads in million.% bases ≥ Q30: percentage of bases with a quality score greater than 30 of all bases.Mean Quality: The average quality score for the bases.% Perfect Index: The percentage of reads with perfectly matching indices of all reads.
-
Sample general info
Sample ID: sample ID taken from the sample sheet.M Clusters: total number of reads in million.Mb Yield ≥ Q30: total number of bases with a quality score greater than 30 in million.% R1 Yield ≥ Q30: percentage of bases with a quality score greater than 30 of all bases calculated only for forward reads.% R2 Yield ≥ Q30: percentage of bases with a quality score greater than 30 of all bases calculated only for reverse reads.% R3 Yield ≥ Q30: percentage of bases with a quality score greater than 30 of all bases calculated only for indices.% Perfect Index: The percentage of reads with perfectly matching indices of all reads.
flowcell.L0*.mgikit.sample_stats
This file contains the informaiton in the above mentioned reports but in simple format. This is used to merge the reports from multiple lanes into one report for the whole run.
flowcell.L0*.mgikit.undetermined_barcode.complete
This report contains the undetermined barcodes including their frequency.
flowcell.L0*.mgikit.undetermined_barcode
This report contains the top 50 frequent barcodes from the above report (4). This file is used for the mgikit plugin to visualise quality control reports through MultiQC.
flowcell.L0*.mgikit.ambiguous_barcode.complete
This report contains the ambiguous barcodes (matched to multiple samples with the same mismatch count) including the frequency of these barcodes.
flowcell.L0*.mgikit.ambiguous_barcode
This report contains the top 50 frequent barcodes from the above report (6). This file is used for the mgikit plugin to visualise quality control reports through MultiQC.
The first three reports must be generated for each run. It is unlikely that the fourth and fifth reports will not be generated as usually there should be some undetermined reads in the run. It is highly likely that the sixth and seventh reports will not be generated. If they are generated, it is recommended to make sure that the input sample sheet does not have issues and that the allowed mismatches are less than the minimal Hamming distance between samples.
Generat MultiQC report from mgikit reports
In order to generate a multiqc report from mgikit reports, multiqc needs to be installed.
Here is an example of how to generate the report:
pip install MultiQC
git clone https://github.com/sagc-bioinformatics/mgikit-multiqc

cd mgikit-multiqc
python setup.py install

# To test the installation, run the following on the testing dataset available at the plugin repository
multiqc mgikit-examples/test/
Parallel execution
mgikit supports parallel execution to improve performance. The level and distribution of parallelization are controlled by three parameters:
-
--threads: Sets the total number of threads to be used for execution (both reading and processing). -
--reader-threads: Sets the number of threads dedicated to reading (possible values are 0, 1, 2, 4). When there is more than 1 thread per input file (R1 and R2 files), one thread will be used for reading, and the other for decompression. -
--writer-threads: Sets the number of threads dedicated to processing and writing output files.
Parameter Priority
If both --writer-threads and --reader-threads are greater than 0, these values take priority and are used directly. The --threads parameter will be ignored.
If either --writer-threads or --reader-threads is 0 (or not set), The --threads parameter will be used to determine the total concurrency.
Default Thread Allocation
mgikit will only use the minimim number of requested threads and available CPU core. The default behavoir is:
-
If you only have 1 CPU core, all work happens in a single processing thread.
-
If your data is paired-end:
-
2–4 CPU cores: 1 thread is used for reading, the rest for processing.
-
5–8 CPU cores: 2 threads are used for reading, the rest for processing.
-
9 or more CPU cores: 4 threads are used for reading, the rest for processing.
- If your data is single-end:
-
4 or fewer CPU cores: 1 thread is used for reading, the rest for processing.
-
More than 4 CPU cores: 2 threads are used for reading, the rest for processing.
This default configuration showed the best performance in testing datasets.
Example
threads = 8 → 2 reader threads, 6 processing threads.
reader-threads = 4 and writer-threads = 2 → Uses exactly 4 readers and 2 writer threads; threads is ignored.
Performance evaluation
Performance time (in minutes) evaluation and comparison on different datasets. DS01 and DS04 are 10 bp dual index, DS02 and DS3 are 8 bp dual index and DS05 is 8 bp single index. In the case of single-end, the R2 file of the dataset is used alone for demultiplexing.
| Dataset | Reads | Samples | Length (bp) | Size (GB) | Paired-end | Single-end | ||
|---|---|---|---|---|---|---|---|---|
| R1 | R2 | R1 | R2 | |||||
| DS01 | 298303014 | 102 | 300 | 320 | 76 | 85 | 71.5 | 37.2 |
| DS02 | 494667136 | 39 | 148 | 172 | 65 | 75 | 61.5 | 31.8 |
| DS03 | 506600595 | 29 | 100 | 124 | 46 | 55 | 43.5 | 30 |
| DS04 | 274567350 | 5 | 28 | 70 | 8.5 | 19 | 13 | 11.9 |
| DS05 | 500612381 | 64 | 50 | 8 | 22 | 5.5 | 12 | - |
Memory utilisation
The default parameters of the tool are optimised to achieve high performance. The majority of the memory needed is allocated for output buffering to reduce writing-to-disk operations.
The expected memory usage is influenced by three main factors,
- Number of samples in the sample sheet.
- Writing buffer size (
--writing-buffer-sizeparameter, default is67108864). - Compression buffer size (
--compression-buffer-sizeparameter, default is131072). - Single-end or paired-end input data.
The expected allocated memory is
-
Single-end input:
number of samples * (writing buffer size + 2 * compression buffer size). -
Paired-end input:
2 * number of samples * (writing buffer size + 2 * compression buffer size).
When using the default parameters:
-
Single-end input:
number of smaples * 64.25 MB. -
Paired-end input:
2 * number of smaples 64.25 MB.
Reducing the writing buffer size will reduce the required memory but also affect the performance time.
Testing datasets
We have attached a simple python script to generate paired-end fastq files. The script is available under mgikit/testing_data/generate_fastq/. You can use this script to generate large fastq files with random content for testing as described in the readme file under the directory.
Execution examples
You can use the datasets at testing_data to perform these tests.
1. Demultiplexing a run with dual indexes (i7 and i5)
target/release/mgikit  demultiplex \
        -i testing_data/input/ds01/L01/ \
        -s testing_data/expected/ds01/sample_sheet_expected.tsv \
        -o ./output \
2. demultiplexing a run with dual indexes (i7 and i5) keeping MGI format
target/release/mgikit  demultiplex \
        -i testing_data/input/ds01/L01/ \
        -s testing_data/expected/ds01/sample_sheet_expected.tsv \
        -o ./output \
        --disable-illumina \
        --lane L01
3. demultiplexing a run with single index i7 and umi
target/release/mgikit  demultiplex \
        -f testing_data/input/ds08/L01/FC08_L01_read_1.fq.gz \
        -r testing_data/input/ds08/L01/FC08_L01_read_2.fq.gz \
        -s testing_data/expected/ds08/sample_sheet_expected.tsv \
        -o ./output \
        --disable-illumina \
        --lane L01
4. demultiplexing a run using general template
 target/release/mgikit  demultiplex \
        -f testing_data/input/ds08/L01/FC08_L01_read_1.fq.gz \
        -r testing_data/input/ds08/L01/FC08_L01_read_2.fq.gz \
        -s testing_data/expected/ds08/sample_sheet_expected.tsv  \
        -o ./output \
        --instrument ins_01 \
        --run 20231212 \
        --lane L01 \
        --template i78:--8
5. demultiplexing a mixed library run
target/release/mgikit  demultiplex  \
        -f testing_data/input/ds02/L01/FC02_L01_read_1.fq.gz \
        -r testing_data/input/ds02/L01/FC02_L01_read_2.fq.gz \
        -s testing_data/expected/ds02/sample_sheet_expected.tsv  \
        -o ./output \
        --instrument ins_01 \
        --run 20231212 \
        --lane L01
6. demultiplexing a run with samples from multiple projects
The main difference here is that the sample sheet contains a column that links each sample to a specific project. The main difference in the output is that the tool will generate reports for the samples of each project.
target/release/mgikit  demultiplex   \
        -f testing_data/input/ds02/L01/FC02_L01_read_1.fq.gz \
        -r testing_data/input/ds02/L01/FC02_L01_read_2.fq.gz \
        -s testing_data/expected/ds02/sample_sheet_expected_proj.tsv \
        -o ./output \
        --instrument ins_01 \
        --run 20231212 \
        --lane L01
6. demultiplexing a run with samples from multiple projects
The main difference here is that the sample sheet contains a column that links each sample to a specific project. The main difference in the output is that the tool will generate reports for the samples of each project.
Contributors